Define Your Design Vision with Mood Boards
Planning a kitchen renovation? Whether you’re updating a few finishes or starting from scratch, creating a kitchen mood board for your renovation is one of the smartest ways to clarify your style, stay organized, and make confident decisions throughout the process.
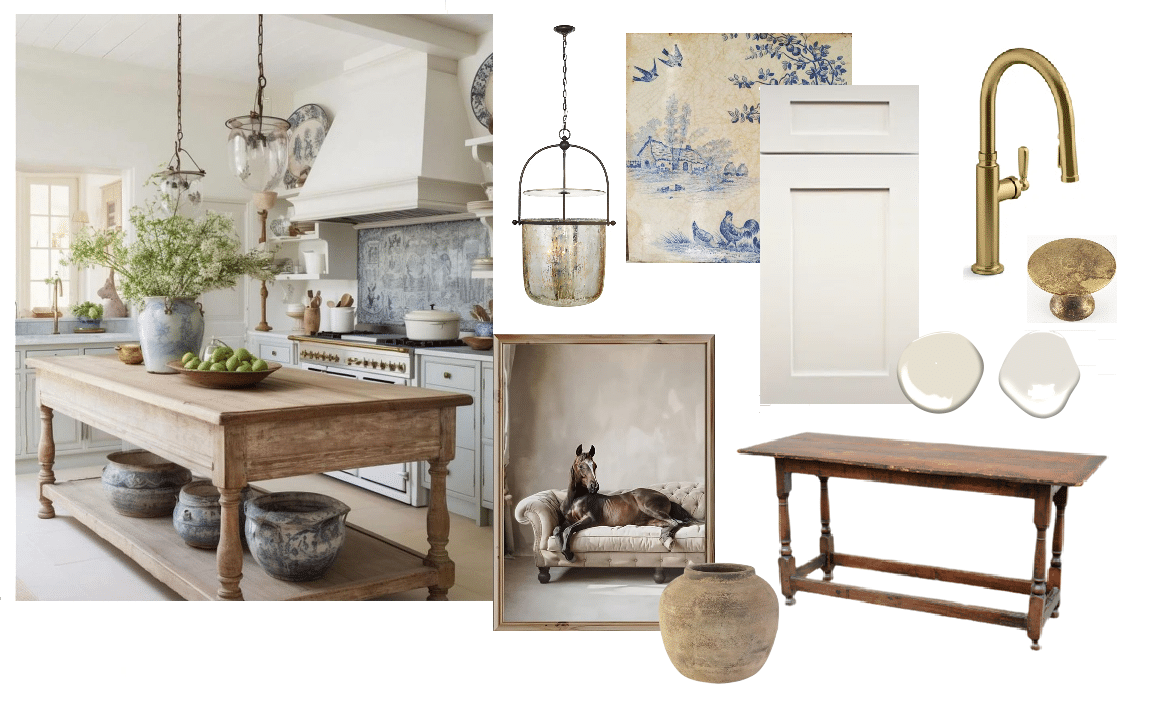
A mood board acts as your personal design compass. It brings together visuals—such as colours, textures, layouts, and materials—to form a cohesive picture of the kitchen you are striving for. More than just a collection of pretty pictures, it’s a strategic tool that will help you align your design direction with the practical needs of your space, your budget, and your lifestyle.
Here’s how to build a kitchen renovation mood board that reflects your vision and helps you shop with purpose.
Step 1: Assess Your Existing Kitchen Elements
Before diving headfirst into Pinterest boards or design magazines, take a thoughtful inventory of your current kitchen. Understanding what’s already in place—and what’s staying—will help you create a design that feels cohesive, not conflicting. This is a critical first step in any kitchen planning process, whether you’re doing a full renovation or just a style refresh. Ask yourself:
Which elements are staying?
- Cabinets (even if you’ll paint or refinish them)
- Countertops
- Flooring
- Appliances
- Backsplash
Retaining features can save money, but only if they work with your future vision. Photograph each of these items and if possible, collect physical samples—like a cabinet door or flooring offcuts—to help match colours and finishes during your selection process.
What style do these elements reflect?
Understanding the style of your current kitchen will help you choose new elements that blend well or identify where you’ll need to make adjustments.
- Traditional: Often features detailed cabinetry, warm wood tones, and classic materials like stone or ceramic.
- Modern: Clean lines, minimal ornamentation, and sleek materials like glass, metal, or high-gloss surfaces.
- Transitional: A balanced mix of traditional and modern styles—think shaker cabinets with modern hardware, or a classic, traditional chandelier with modern furniture.
Naming your style is not ultimately that important. The important thing is to take a little time and make note of the details of your home: cabinet doors, baseboard, passage doors, casing (trim around your passage doors), etc. Are they ornate or minimal? Knowing this will help you to determine design choices moving forward that align with the design of your home.
What colours and finishes are already in place?
Document everything from the finish on your appliances (e.g., brushed stainless steel or matte black) to the tones in your flooring (e.g., warm oak or cool grey tile). If you don’t have physical samples, your photos can still be useful when checking how new ideas will look alongside your existing features.
You may also want to note undertones of your materials—cool or warm—as this will impact how well new colours will pair. For example, a cool white cabinet might look stark next to a warm beige tile floor.
Do these elements align with your vision—or will they need to be adjusted?
Once you have a clear view of what you’re keeping, compare these features with the kitchen styles you’re drawn to in your inspiration research. Do they naturally align, or do you need to find ways to integrate them into your updated look?
If your existing cabinets are staying but don’t quite match your new countertop ideas, could painting them help bridge the gap? If you’re keeping a stainless steel fridge, can you choose lighting and hardware in finishes that complement it—like brushed nickel or matte black?
Look for inspiration images where similar materials are successfully integrated into updated designs. This not only sparks ideas but can also give you confidence that your current pieces can work with your new direction—maybe with just a few thoughtful updates.
Pro Tip: If your kitchen connects to other rooms, consider the overall architectural style of your home. A hyper-modern kitchen might feel disconnected in a heritage house. Pull some images of your existing space—especially trim details or built-ins—and include them in your board to maintain harmony.

Studio McGee
Step 2: Gather Kitchen Design Inspiration
Now comes the fun part—searching for inspiration that reflects your ideal kitchen. This is where platforms like Pinterest, Instagram, design blogs, and even home décor magazines can be incredibly helpful.
Focus on collecting:
- Kitchen layout ideas
- Cabinet finishes and door styles
- Backsplashes and countertops
- Light fixtures and decorative hardware
- Color palettes and textures
- Appliances, faucets, and sinks
Think about the mood you want to set: Is it cozy and rustic? Bright and modern? Minimal and serene? Save any image that sparks something in you.
Step 3: Curate and Organize by Style, Colour, and Function
Once you’ve gathered a collection of images, it’s time to curate and organize. This step helps bring clarity and cohesion to your vision.
Start by grouping your inspiration by category:
- Colour and texture: Look for repeating tones and finishes. Are you drawn to warm wood tones, matte black hardware, or glossy white tiles?
- Layout and space planning: Which kitchen layouts appeal to you most? Do you prefer a galley kitchen, U-shape, or open-concept with an island? Note clever storage ideas or workflow features like the “kitchen triangle” (sink-stove-fridge).
- Fixtures and finishes: Compare lighting styles, faucet finishes, cabinet handles, and appliance colours. Group similar styles to see what combinations feel most balanced.
Design Tip: Other than Pinterest, tools like Canva, Google Slides, or PowerPoint also make it easy to create digital mood boards. You can also use poster board and magazine cutouts for a more tactile experience.
Step 4: Refine Your Vision and Remove the Clutter
As your mood board evolves, patterns will begin to emerge. You’ll notice consistent colour schemes, material preferences, and stylistic details. This is a great moment to edit ruthlessly.
- Eliminate images that no longer align with your vision.
- Keep the ones that match both your dream design and the real-world constraints of your kitchen.
- Organize your mood board into clear categories: Cabinets, Countertops, Lighting, Hardware, etc.
You’re not just collecting pretty ideas—you’re defining your design direction.
Step 5: Finalize Your Mood Board and Use It With Confidence
Once you’ve refined your images and groupings, step back and review your complete kitchen renovation mood board. Ask yourself:
- Does this reflect the kitchen I want to live in?
- Does it work with the architecture and style of my home?
- Can I use this to confidently make product selections—or communicate my vision to a contractor or designer?
If the answer is yes, congratulations! You now have a visual reference guide that will help you stay on track as you move into the planning, sourcing, and execution phases of your kitchen remodel.
Budget-Friendly Design Tip: If you’re working within a strict budget, be sure to save inspiration for DIY upgrades, affordable material swaps, and cost-saving kitchen remodelling tips. There are plenty of ways to get high-end looks without overspending.
Why Mood Boards Matter in Kitchen Design
Whether you’re planning a full remodel or simply updating a few finishes, creating a kitchen mood board for your renovation ensures that every design decision contributes to a cohesive and functional space. It saves you from impulse purchases, design missteps, and style mismatches.
And remember—your mood board can evolve as your project progresses. It’s not a rigid plan, but a flexible, visual guide to help you create a kitchen that’s as beautiful as it is practical.

Ready to Start Your Mood Board?
Grab your favourite mood board tool (digital or analog) and begin collecting your ideas. The earlier you start, the easier the rest of your kitchen design process will be.
Need help evaluating your existing kitchen? Download my Free Kitchen Assessment Questionnaire to identify what’s working—and what’s not—before you start designing.


